

If you’ve walked into your shed and found chewed-up boxes, little black droppings, or a hole in the corner that definitely wasn’t there last spring, you’re dealing with mice. It happens to almost everyone who owns a shed. The good news is that getting them out and keeping them out isn’t complicated once you know what actually works. I’ve spent 18 years dealing with rodent problems in sheds, garages, and barns, and I’m going to walk you through exactly what I’d do if this were my own backyard.
Also Read: Ammonia For Mice: Does It Really Repel Or Kill Them?
Quick Answer
The most effective way to keep mice out of a shed is to combine exclusion with good sanitation. Remove clutter and accessible food, clean up signs of activity safely, seal gaps around doors, walls, vents, and the foundation, and use traps if mice are already inside. Scent repellents such as dryer sheets or peppermint oil should be treated as optional extras, not as substitutes for sealing the shed.
What Works Best for Keeping Mice Out of a Shed
If you’re wondering how to keep mice out of a shed long term, the answer is exclusion: make the building difficult to enter, remove the things that attract mice, and deal with any mice that are already inside.
- Seal entry points — This is the most important long-term prevention step.
- Remove food and nesting material — Make the shed less attractive to mice.
- Use traps for mice already inside — Don’t expect exclusion alone to remove an established infestation.
- Clean up signs of activity safely — Reduce contamination and make new activity easier to spot.
- Use scent deterrents only as optional extras — Dryer sheets and essential oils shouldn’t replace exclusion or trapping.
In my experience, homeowners get into trouble when they spend most of their effort looking for a repellent while ignoring the hole the mice are using to get inside.
8 Steps to Mouse-Proof Your Shed
The most effective approach is to work through these steps in order, starting with cleanup and exclusion, then dealing with any mice that are already inside.

1. Clean Up
Before you do anything else, clean out your shed. I know that’s not what anyone wants to hear, but it’s an important first step because it removes nesting material, exposes hiding places, and makes it much easier to find fresh signs of activity. Just remember that cleaning alone won’t keep mice out. The long-term fix is finding and sealing the openings they’re using to get inside.
Think about what a shed usually holds: cardboard boxes, firewood, old paint cans, spare lumber, garden tools, maybe some bags of fertilizer or grass seed. To you, that’s storage. To a mouse, that’s a five-star hotel. Cardboard shreds easily into soft nesting material, clutter gives them cover from predators, and all those forgotten corners are perfect for raising a litter undisturbed.
Start by pulling everything out, or at least everything you can move. Get rid of cardboard boxes entirely and replace them with sealed plastic totes with locking lids. Mice can chew through plastic if they’re motivated enough, but a smooth-sided, tightly sealed bin is a lot harder for them to get into than a box with flaps.
Toss any old appliances or electronics sitting around. Mice love chewing on wire insulation, and the inside of an old radio or lawnmower engine makes a cozy, hidden den. Clear out scrap wood, yard debris, and any pile of “stuff I’ll deal with later,” because that’s exactly where mice like to build nests.
Once the shed is emptied out, be careful with any droppings, urine, or nesting material you find. Don’t dry-sweep or vacuum mouse droppings, because disturbing contaminated material can put potentially harmful particles into the air. Instead, ventilate the shed if possible, wear disposable gloves, thoroughly wet the droppings and surrounding area with an appropriate disinfectant, following the product’s label directions for contact time and then wipe everything up with paper towels. Bag the waste securely and wash your hands afterward.
The CDC recommends these precautions because contact with contaminated rodent material can pose a health risk, particularly when dried material is disturbed. A properly cleaned shed is also easier to inspect for new droppings and fresh signs of activity.
Cleaning removes the evidence and contamination, but it doesn’t solve the reason mice got inside. Think of cleanup as resetting the shed and exclusion as fixing the problem. If fresh droppings start appearing again after you’ve cleaned, don’t just clean them a second time. Follow the trail and look for the opening that allowed the mouse back in.
While you’re cleaning, it helps to organize the shed differently going forward, not just for this one cleanup, but as a habit. Keep everything up off the floor on shelving where possible. Mice are excellent climbers, but a raised, open shelf with nothing stacked against the wall is much less inviting than a dark floor-level pile they can burrow into undisturbed. Leave a little breathing room between stored items too, since tight, undisturbed gaps are exactly what a mouse looks for when scouting a nesting spot. A shed that’s easy to walk through and see into is a shed that’s much harder for a mouse to hide in unnoticed.
2. Place Traps
Once your shed is cleaned out, it’s time to deal with any mice that are already inside. Traps are still the most reliable, no-nonsense way to handle an active problem, and there are more options now than the classic wooden snap trap your grandfather used.
Snap traps are usually the simplest first choice for an active mouse problem. Electronic traps are another option, while glue traps are generally not my preferred recommendation because they can leave a live animal trapped and create a difficult disposal situation. If you’re trying to keep your approach as low-toxicity as practical, there are also broader eco-friendly pest control methods worth considering, although the same basic rule applies: prevention and exclusion should come first.
Live-catch traps are available, but releasing a mouse somewhere else doesn’t address the conditions that allowed it into the shed in the first place, and local rules may apply to relocating wildlife. Whatever trap you use, follow the manufacturer’s instructions and keep traps away from children and pets.
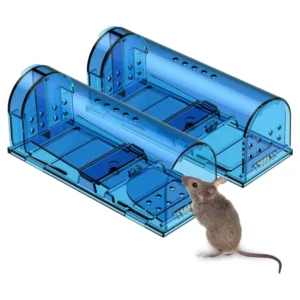
Whichever style you choose, placement matters more than the trap itself. Put traps against walls, since mice tend to travel along edges rather than out in the open. Peanut butter, oats, or another small food item can work as bait, but don’t get too hung up on the bait itself. Trap placement is usually more important than finding the perfect food. If you prefer a no-kill option, you can also see this reusable live-catch mouse trap on Amazon.
Trapping and exclusion serve different purposes: traps deal with the mice that are already inside, while sealing the building prevents new mice from replacing them. If you only do one, you can easily end up chasing the same problem repeatedly.
Expert Tip: Don’t judge your trapping effort by how many traps you own. Placement is what matters. Put several traps along walls and near areas where you’ve found fresh droppings, gnaw marks, or nesting material. A trap sitting in the middle of an empty shed may go untouched while a trap positioned beside a wall or along a mouse travel route gets action quickly. Check traps regularly rather than leaving them forgotten for weeks.
3. Remove Sources of Food and Water
A mouse doesn’t move into your shed because it likes the decor. It moves in because the shed offers shelter, and often, food and water too. Here’s the part that surprises a lot of homeowners: mice don’t need a large, obvious food source to make use of a shed. A torn bag of seed, a few spilled grains, pet food, or other small food sources can be enough to keep them investigating the area.
Bags of birdseed, pet food, plant seeds, grain, fertilizer, and grass seed are some of the biggest culprits I see in sheds. Mice will chew straight through a paper or thin plastic bag to get at what’s inside, and once they find a reliable food source, they have very little reason to leave. If you store any of these items, transfer them into airtight, hard-plastic or metal containers with secure lids.
Water is just as important to check for. A dripping hose bib, a leaky watering can, or even a bucket that collects a little rainwater through a gap in the roof can be enough to sustain a mouse. Walk through your shed and eliminate any standing water, fix leaks where you can, and store liquids in sealed containers. Between a clean floor and no accessible food or water, you’re making your shed a genuinely unappealing place for a mouse to settle down.
4. Seal Up Entrances
If your goal is to learn how to keep mice out of a shed long term, this is the step that matters most. Exclusion is what actually stops new mice from getting in, and it’s worth taking your time on. Mice can squeeze through surprisingly small openings—about 1/4 inch in some cases—so you’re not just looking for obvious holes. You’re looking for anything a mouse could realistically flatten its body to fit through.
Walk the outside of your shed first. Check where the walls meet the foundation, around the base of the door and windows, along the roofline, and anywhere pipes, cables, or vents pass through the wall. Then do the same walk on the inside, looking for daylight coming through gaps, chew marks on wood, or worn spots around the door frame.
If you can’t find the opening: Check the shed at ground level rather than only from a standing position. Look closely around door corners, thresholds, foundation joints, utility penetrations, and damaged siding. Fresh droppings or small amounts of gnawing near one particular area can also help narrow down where mice are traveling. When the opening isn’t obvious, follow the signs rather than trying to inspect every inch of the shed equally.
Once you’ve mapped out the weak points, seal them with materials appropriate for the size and location of the opening. For common shed gaps, think in terms of the opening: weather stripping or a door sweep for door gaps, caulk for small cracks, durable metal mesh or hardware cloth for larger openings, and proper repairs for damaged boards, siding, vents, or roofing.
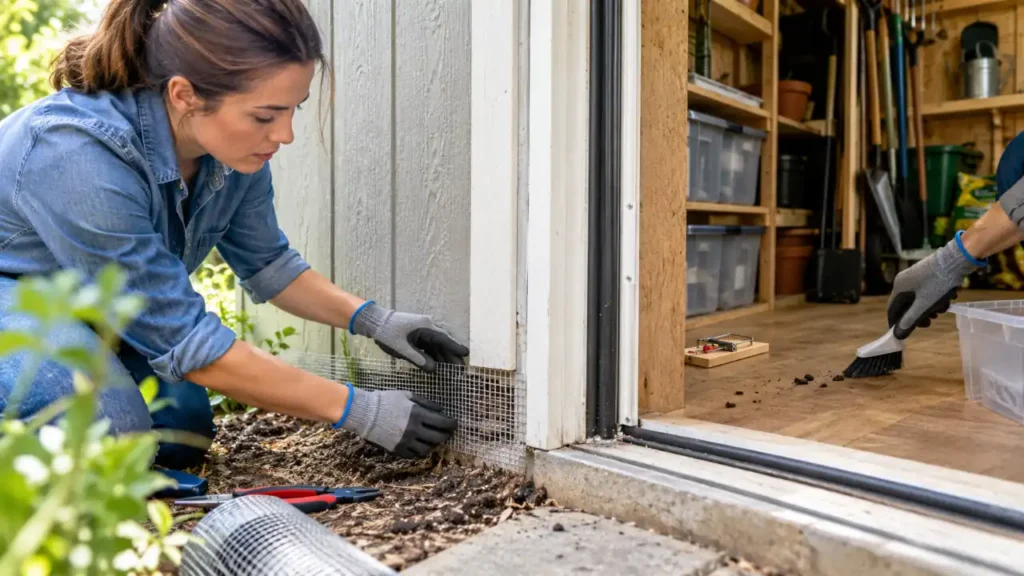
Caulk can handle small cracks, while durable metal mesh or hardware cloth is a better choice for larger openings and areas that are exposed to chewing. Door sweeps and weather stripping can close gaps around doors. Steel wool is sometimes used as a temporary filler for small openings, but I wouldn’t treat it as the finished repair by itself.
The goal isn’t to make the shed perfectly mouse-proof overnight. It’s to eliminate the practical openings mice are using and create a durable barrier they can’t easily chew through or push aside. Also inspect vents, damaged siding, roof edges, and the area where the shed meets the ground, because an otherwise solid shed can still have one small access point.
Field Note: One of the easiest entry points to miss is the bottom corner of a shed door. The opening may look insignificant to a homeowner standing upright, but when you’re looking at it from a mouse’s level, a continuous gap along the threshold can be an open invitation. I always inspect the entire door perimeter rather than just looking for obvious holes in the walls.
It’s worth checking the shed at least twice a year, particularly in spring and again before colder weather arrives. Wood swells, settles, and shifts with the seasons, and a gap that wasn’t there last summer can easily open up over a cold winter. Mice also tend to push harder to get indoors as the weather cools, so a fall inspection right before temperatures drop can save you from an unpleasant surprise. Keep a small tube of caulk and a bag of steel wool on hand in the shed itself, so touch-ups take five minutes instead of turning into a whole afternoon project.
5. Let Your Cat In
A cat may catch mice, but I wouldn’t make a cat your primary mouse-control strategy. Cats are predators, and their presence can sometimes discourage rodents, but a cat won’t seal entry points, remove food sources, or eliminate a hidden nest. If you already have an outdoor or indoor-outdoor cat, its presence around the shed may provide some additional pressure on mice, but the important work is still exclusion and sanitation.
If you let a cat enter the shed, check the area carefully first. Keep rodenticides, pesticides, antifreeze, fertilizers, sharp tools, and other hazardous materials inaccessible, and make sure the cat cannot become trapped inside.
6. Don’t Rely on Dryer Sheets
Dryer sheets are one of the most common home remedies you’ll see recommended for keeping mice away, but I wouldn’t count on them as a reliable control method. A strong fragrance may temporarily change the smell of an area, but there isn’t a good reason to treat dryer sheets as a substitute for sealing entry points, removing food, or trapping mice that are already inside.
If you like using them as a temporary extra measure, there’s little reason to make them the centerpiece of your strategy. Put your effort into the measures that address the actual problem: exclusion, sanitation, and trapping.
7. Be Skeptical of Scent Repellents
Peppermint oil, cinnamon, clove, and other strong scents are frequently promoted as natural mouse repellents. If you’re curious about what scents mice hate, there are several commonly recommended options, but they shouldn’t be confused with a reliable exclusion method. They may temporarily make an area less appealing, but I wouldn’t rely on essential oils to keep an established mouse population out of a shed.
The problem is simple: a strong smell doesn’t close a hole. It doesn’t remove nesting material, and it doesn’t stop a hungry mouse from returning to a location that provides shelter and food. If you choose to use a scent-based product, treat it as an optional supplement rather than your primary control method. Ammonia is another home remedy commonly suggested for mice, but it has the same basic limitation: a strong smell doesn’t seal an entry point or remove an established infestation.
If your goal is long-term prevention, your time is better spent finding the entry point and eliminating whatever is attracting the mice in the first place.
8. Hire An Exterminator
Sometimes you do everything right and mice are still getting into your shed, or the infestation is bigger than a few DIY traps can realistically handle. That’s when it makes sense to bring in a professional.
An experienced pest control technician can spot things an untrained eye tends to miss, subtle entry points, hidden nests behind stored items, or chew marks that suggest mice have been active for longer than you realized. They’ll also be able to tell you how severe the problem actually is, which matters a lot if you’re dealing with an old shed that’s accumulated years of clutter.
A professional assessment should focus first on finding out why the mice are getting into the shed and where they are traveling once inside. Depending on the situation, that can mean combining exclusion, trapping, sanitation, and other control methods. Rodenticides may be appropriate in some circumstances, but they require particular care around pets, children, and non-target wildlife.
They can also create an odor problem if a poisoned mouse dies somewhere inaccessible. For a small shed infestation, I would generally want the homeowner to address entry points and use appropriately placed traps before jumping straight to poison. If fresh signs continue despite those measures, that’s a good point to have the situation professionally assessed.
Why It’s Important to Keep Mice Out of Your Shed
It’s tempting to shrug off a mouse or two in the shed as a minor annoyance. I get it—it doesn’t feel like a big deal at first. The problem is that mice can reproduce quickly when they have dependable shelter, food, and nesting material. A small amount of activity in spring can become a much larger problem surprisingly fast. House mice can begin breeding at a young age, and females can produce multiple litters in a year.
That means a few mice that find dependable shelter and food can turn into a much larger population surprisingly quickly. What looks like a small problem in March can turn into a full-blown infestation by summer if it’s left alone.
There’s also the damage to consider. Mice gnaw on a wide range of materials, including wood, wiring, insulation, and stored fabric. Because their incisors continue growing throughout their lives, gnawing is a regular part of their behavior. If your shed has electrical wiring for lights or outlets, chewed insulation is a genuine fire risk, not just a repair headache. Add in the destruction of stored tools, seasonal decorations, or anything else you’re keeping out there, and the cost of ignoring a mouse problem adds up fast.
Health is the other piece people tend to underestimate. Mice can carry pathogens that spread through their droppings, urine, and saliva, and dried droppings can release particles into the air when disturbed. Rodent droppings, urine, and nesting material can pose health risks when they are disturbed, which is why cleanup deserves more attention than simply sweeping the shed floor. The CDC’s guidance on hantavirus and rodent exposure recommends precautions for reducing exposure to potentially contaminated rodent material. Keeping mice out of your shed isn’t just about protecting your stuff. It’s about protecting your health and your family’s too.
Also Read: How To Use Steel Wool for Mice to Keep Them Out Fast
If you find a large accumulation of droppings, urine, or nesting material, don’t treat it like ordinary shed dirt. The greater the amount of contaminated material and the more heavily disturbed the area is, the more important proper protective and cleaning procedures become. If you’re uncomfortable cleaning a heavily contaminated space yourself, consider having it professionally assessed rather than taking unnecessary exposure risks.
There’s also a practical, financial angle worth mentioning. Once mice establish themselves in a shed, they may eventually explore nearby structures if those areas offer easier access to food, water, or shelter. If rodent activity eventually shows up in an attic or other enclosed part of the house, the problem becomes a different kind of exclusion and removal job. For example, rats in an attic require a different approach to removal and exclusion than a small mouse problem in a shed.
A shed that backs up to your house, garage, or fence line gives them an easy, sheltered route to move closer to where you live. What starts as a shed problem can sometimes spread to nearby structures if mice find an easier source of food, water, or shelter. Dealing with the issue while it’s still contained to an outbuilding is a lot cheaper and a lot less stressful than trying to evict mice from your actual living space later on.
Conclusion
Learning how to keep mice out of a shed isn’t really about finding one magic repellent. The reliable approach is to make the building difficult to enter and uninteresting to stay in. Clean up nesting material and clutter, store food in secure containers, eliminate accessible water, seal gaps around the building, and use appropriately placed traps if mice are already inside.
I would put exclusion at the top of the list. A shed can be perfectly clean and still have a mouse problem if there’s a quarter-inch gap under a door or an opening where the wall meets the foundation. Find that opening and fix it, and you’re addressing the problem at its source rather than repeatedly chasing the symptoms.