How to get rid of rats in walls is a question nobody wants to type into Google at 2 am, but here you are. The good news is that you can often solve this without tearing open drywall or relying on poison inside wall cavities. The plan is simple. Find where they get in, trap them out, then seal every hole. I’ll walk you through each step the way I would explain it to a friend.
Also Read: Squirrel Poop vs Rat Poop: How to Tell in 10 Seconds
Quick Answer: How to Get Rid of Rats in Walls
To get rid of rats in walls, first identify their entry points and travel routes inside and outside the house. Next, remove the rats using properly sized snap traps placed along their travel paths. Avoid using poison inside wall cavities because rats may die in inaccessible areas. Finally, confirm that the infestation has been cleared and seal remaining openings with securely installed metal mesh, hardware cloth and appropriate sealant to prevent rats from returning.
Key Takeaways
Signs You Have Rats in Your Walls
The first thing most people notice is the noise. Scratching, scampering and the occasional thump behind a wall or above a ceiling, usually after dark. Rats are generally more active at night, particularly when the house is quiet, although they can also move around during daylight hours. If the sounds seem to travel from one spot to another, you may be hearing an animal moving through the wall cavity rather than a pipe ticking as it cools. You might also hear gnawing, which is a dry, rhythmic scraping, and now and then a squeak when they are fighting or when young ones are in the nest.
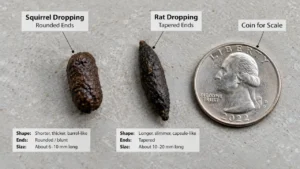
Sound is only the start. Look at the bottom of your walls and around pipes. Rats run the same routes again and again, and their oily fur leaves dark, greasy smudges along baseboards and around gaps. Droppings are the other big giveaway. Rat droppings are typically dark, capsule-shaped and larger than mouse droppings.
If you’re having trouble telling them apart from squirrel droppings, the differences can be easier to spot when you compare the two side by side. Larger rat droppings can measure around half an inch to three-quarters of an inch long, although their size varies depending on the species and age of the animal. Check inside cabinets, behind the fridge, under sinks and along the edges of the garage or basement.
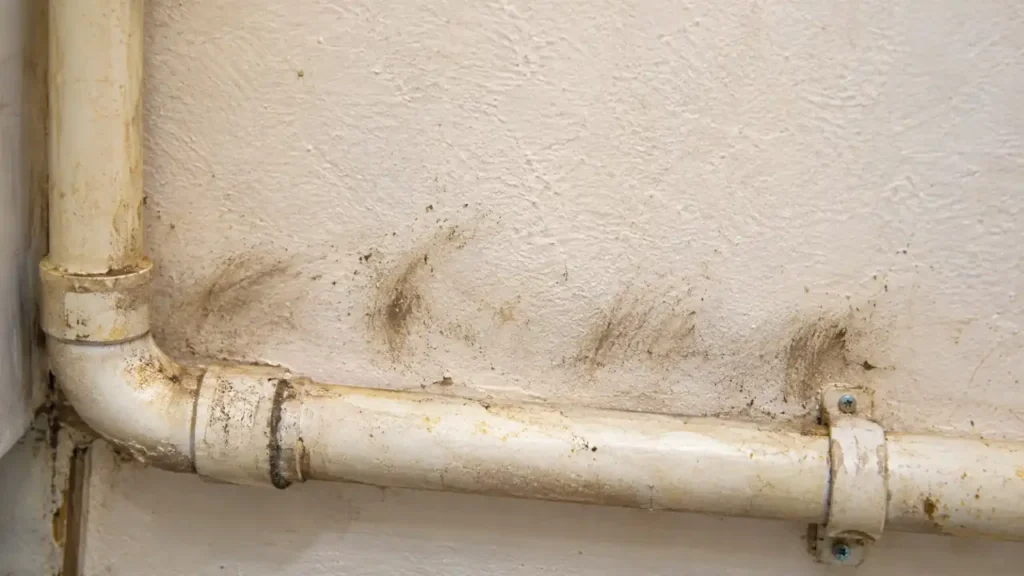
Smell matters too. A stale, musty, ammonia-type odor in a room with no obvious cause often means a nest is close by. Add a few other clues and the picture gets clear. Gnaw marks on baseboards or wooden studs, shredded insulation or paper poking out of a gap, pet food bags with chewed corners, and your dog or cat staring at one section of wall for ages. If you tick off two or three of these, treat it as a real infestation and move on to the plan below.
Why Rats Choose to Live Inside Walls
Wall cavities offer rats warmth, shelter, and a protected place to nest. Insulation can provide nesting material, while gaps around plumbing, wiring, and structural framing give them routes between wall spaces, attics, ceilings, and floor joists. These hidden connections let rats move through a house without crossing open rooms.
Food and water are usually close. Kitchen walls sit next to crumbs, pet bowls and trash cans. Bathroom walls hide plumbing that drips or sweats. A rat does not need much, just a little food and a little water each day, and a wall near your kitchen supplies both with almost no risk. Outdoor conditions push them in as well. Cold snaps, heavy rain, construction nearby and a lack of food outside all send rats looking for shelter, and your house is the obvious choice.
Here is the part people underestimate. Rats breed quickly. A female can have several litters a year, and young rats can reach sexual maturity within a few months. That means a small infestation can grow quickly when food and shelter are available. That is why waiting and hoping the noise stops is a poor strategy. The longer rats remain inside, the more opportunities they have to damage wiring, insulation and other building materials.
It also helps to know which type you have. Norway rats are heavy bodied and tend to stay low, so you will find them in basements, crawl spaces and ground floor walls. Roof rats are slimmer, better climbers, and they prefer attics and upper walls, often coming in along tree branches or utility lines. Knowing which one lives with you tells you where to look first and where to place your traps. These are general preferences, not strict rules. Either species can turn up in unexpected parts of a building, so use the signs of activity to guide your inspection rather than relying on location alone.
The 3-Step Process to Eliminate Rats in Walls
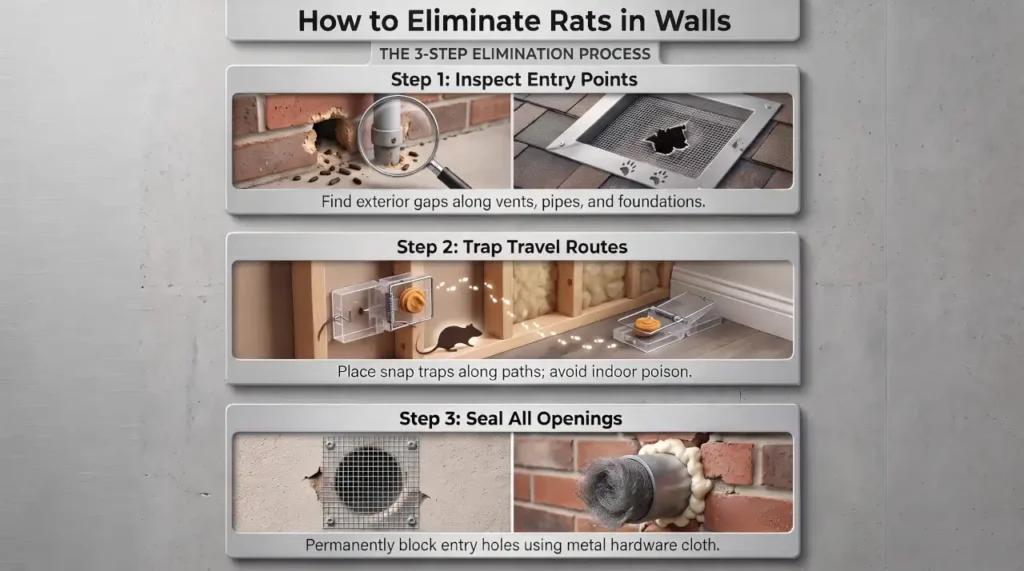
Here is the method I trust, and the reason it works when other approaches fail. Most people jump straight to the middle step. They set a few traps, catch a rat or two, feel good, and then wonder why the scratching returns a month later. Others seal everything up quickly and accidentally lock the rats inside. The order matters. Inspect first, remove second, seal third. Skip a step and you are only buying time.
If you’re wondering how to remove rats from walls without opening up the drywall, the practical approach is to identify where they enter and travel, trap them in accessible areas, and seal the openings once the infestation has been cleared. The key is to remove the rats before closing off their access points.
Step 1: Inspection and Location
Before you buy a single trap, figure out how the rats are getting in and where they travel. Grab a flashlight and start outside, because the entry point is almost always on the exterior. Walk the whole perimeter slowly, from the ground up to the roofline. Look where pipes, gas lines and cables enter the house, because builders often leave a ragged gap around them.
Check the spot where the foundation meets the siding, the corners of the house, vents, window frames, the garage door seal and any damaged soffit or fascia board. Rats can squeeze through surprisingly small openings, sometimes around half an inch wide, depending on their size.
Don’t forget the roof. Roof rats love to walk along branches, fences and wires. Look for tree limbs that touch the house, loose roof tiles, gaps around chimneys and vents with broken screens. Dryer vents and crawl space vents are favorite doorways when the cover is bent or missing.
Next, move inside. Shine your flashlight low along the base of walls in a dim room, because the grease trails and little piles of droppings show up much better at an angle. Check the attic, the basement or crawl space, and the cabinets under your kitchen and bathroom sinks. Look at the holes where pipes pass through the wall behind the cabinet. This is a classic highway for rats moving between the wall and your kitchen. Use the timing and location of the noises to narrow down which wall or ceiling area needs closer inspection. Remember that sound alone cannot confirm the exact entry point.
To confirm which entry holes are active, look for fresh droppings, new gnaw marks, greasy rub marks and tracks around suspected openings. You can also place a small wildlife monitoring camera near an exterior gap if you are unsure whether rats are using it. Check the same areas over several nights rather than relying on one observation. Write down or photograph every suspected entry point. A map of entry holes and runways will make the next two steps much easier, so don’t rush this inspection.
Step 2: Safe and Effective Removal
Now you remove the rats. The core tool is a snap trap, and I mean a proper rat trap, not the small mouse version. Choose sturdy, appropriately sized rat snap traps and use enough to cover the active travel routes you identified during inspection. The number needed depends on the size of the infestation, the layout of the house and how many separate areas show signs of activity.
The trick is where you put them. You can’t set a trap inside the wall cavity, so you place traps where rats come out of the wall or travel to find food. That means along walls in the attic, in the basement, in the crawl space, behind the fridge, and next to the gaps you found in Step 1. Rats tend to travel close to walls and other vertical surfaces. Position standard snap traps perpendicular to the wall, with the trigger end facing the wall and placed directly along the rat’s travel route. In open spaces, rats may simply walk around a poorly positioned trap.
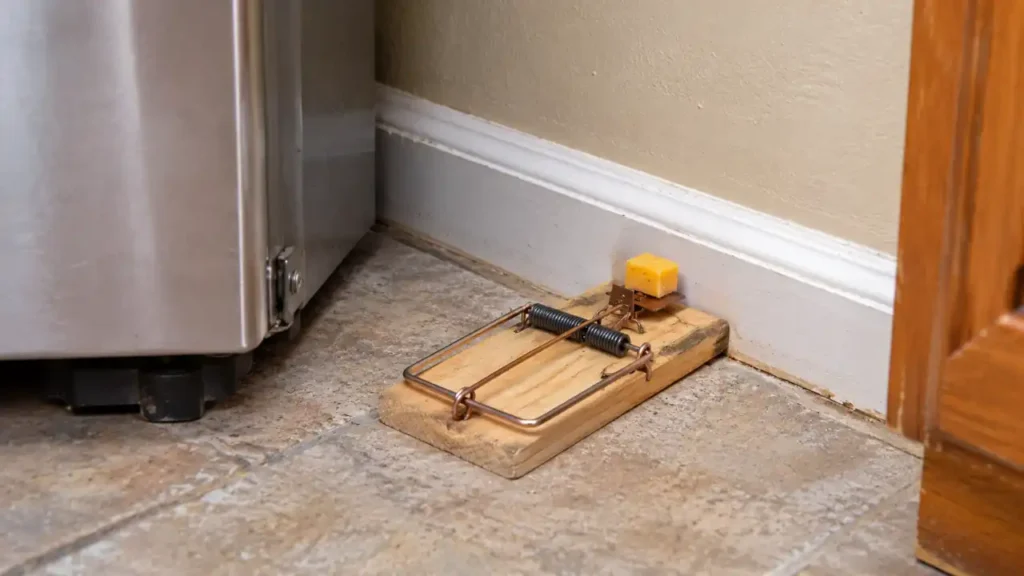
What if the rats never seem to come out of the wall? This usually means you need to identify where they are travelling and whether they have access to the attic, basement, crawl space or another accessible area. A monitoring camera near a suspected opening can help confirm their movement. Don’t start cutting random sections of drywall just because you hear scratching in one spot. If rats remain inaccessible or you cannot identify a safe trapping location, have a pest control professional inspect the cavity and determine whether a small access opening is necessary. This is particularly important when electrical wiring or plumbing runs through the same space.
If you are using multiple traps, spread them across different sections of the runway rather than clustering them in one spot. Whenever possible, use enclosed snap-trap stations, especially in homes with children or pets. Keep traps out of reach of children and pets.
Here is something that surprises many homeowners. Rats can be cautious around unfamiliar objects, including new traps. If they have already been exposed to traps or have survived previous attempts, they may avoid approaching one for several days. In that situation, pre-baiting can help. Place the traps in their usual travel areas with the bait in place but leave the mechanisms unset for two or three nights. Once the rats are feeding confidently, set the traps. This approach is not necessary in every infestation, but it can make a difference with particularly cautious rats.
For bait, use something attractive that stays attached to the trigger. Peanut butter is a common choice, as are small amounts of nuts or dried fruit. Press a pea-sized amount firmly into the bait holder or trigger area, following the trap manufacturer’s instructions. Avoid using too much bait, since a large amount may allow a rat to feed without activating the mechanism. Replace dried or spoiled bait as needed.
Check your traps at least once a day, or more often if the trap manufacturer’s instructions require it. Wear disposable gloves when handling a dead rat, and avoid touching the animal directly. Spray the carcass and surrounding area with an appropriate disinfectant, following the product’s contact-time instructions. Place the rat in a plastic bag, seal it, then place that bag inside a second sealed bag before disposing of it according to local waste rules. Clean and disinfect reusable traps according to their manufacturer’s instructions, and wash your hands thoroughly after removing your gloves.
Reset the traps with fresh bait and continue monitoring until you have stopped catching rats and have found no fresh signs of activity for at least a week. Keep checking the attic, basement and other suspected travel areas rather than assuming the problem is solved because one location has gone quiet.
What about live traps? They can work for a single rat, but they come with problems. You have to check them often, you need a plan for what to do with the animal, and a rat released close to your house will often return. In many places there are also local rules about relocating wildlife. For a real wall infestation with several rats, snap traps are faster and more practical.
Now, the question everybody asks. Should you use poison? I strongly advise against it for rats in walls, and here is why. Rodenticide does not kill instantly. A poisoned rat usually goes back to its nest, often right inside your wall, and dies there.
Now you have a carcass in a space you cannot reach. The smell can last for weeks, flies and beetles show up to feed on it, and you may end up cutting into the wall anyway. Poison also puts pets, kids and wildlife at risk, since a sick rat or its body can be eaten by something else. Traps put the result in your hand where you can see it. This is why properly placed traps are generally more practical for indoor wall infestations: you can monitor the results and remove captured rats.
A quick note about safety: rat droppings, urine and nesting materials can carry disease-causing organisms. Never sweep or vacuum dry droppings because this can send contaminated particles into the air.
In North America, hantavirus is an additional concern when cleaning areas contaminated by certain infected rodents, particularly deer mice. Disturbing dried droppings, urine or nesting material can release contaminated particles into the air. Avoid disturbing contaminated insulation or running equipment that could spread dust from an affected area. If rodent contamination is extensive or involves HVAC components, seek professional cleanup advice before using the system. The risk depends on the rodent species and local conditions, so don’t assume every rat infestation involves hantavirus.
Put on disposable gloves and thoroughly wet the droppings, urine stains and nesting material with an EPA-registered disinfectant, following its label instructions. If using a bleach solution, prepare and apply it according to public-health guidance. Follow the disinfectant’s label for the required contact time. If using bleach, never mix it with ammonia or other cleaning products. Once the material has been properly soaked, wipe it up with paper towels and place everything in a sealed plastic bag.
For heavy infestations, extensive contamination or heavily soiled insulation, professional cleanup is the better option. Wear appropriate protective equipment and avoid disturbing contaminated insulation unnecessarily.
The CDC provides additional guidance in its hantavirus prevention brochure.
Step 3: Exclusion and Sealing
This is the step that makes the fix last. Trapping removes the rats already inside, while exclusion prevents new ones from entering. Do not seal an opening that rats are still using while animals may remain inside the wall or building. Wait until monitoring confirms the infestation has been cleared before permanently closing those entry points.
Choose materials rats cannot easily chew through. For small gaps, tightly fit copper mesh or stainless steel wool into the opening and secure it with an appropriate sealant or repair compound. For larger openings, use galvanized quarter-inch hardware cloth or metal flashing, securely fastened to the surrounding structure. Seal the edges with an exterior-grade sealant where needed. Expanding foam can help fill irregular spaces around a properly installed metal barrier, but never rely on foam alone to keep rats out.
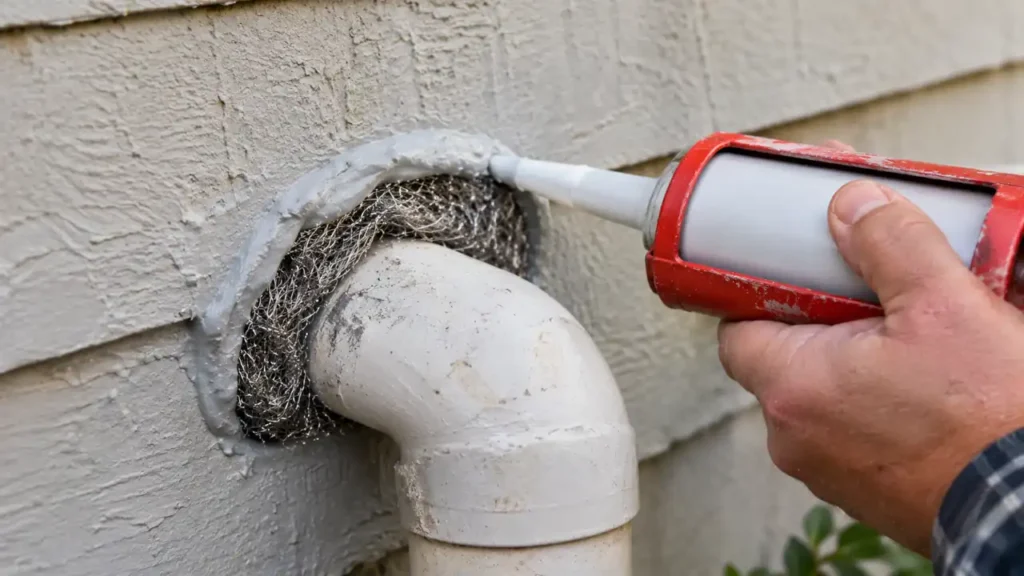
Start with the weak points. Gaps around pipes and cables, the line where foundation meets siding, damaged vent covers, gaps under garage doors, torn screens and any hole in the soffit or roofline. Replace broken vent covers with sturdy metal ones. Add a door sweep to exterior doors with visible gaps at the bottom. Trim tree branches and climbing vegetation so rats cannot use them as direct access routes to the roof, soffits or siding.
In some situations, a one-way exclusion device can help rats leave without allowing them to return. However, it must be installed correctly and used only after you have identified all the entry points. Before using one, make sure there are no young rats or other animals trapped inside. Otherwise, you could separate a mother from her young or leave animals stranded in the wall cavity. If you cannot confidently determine whether the entire group has left, have a pest control professional handle the exclusion work.
After the first heavy rain or a week of weather changes, walk the outside again and check your repairs. Caulk can crack, mesh can shift, and any new chew mark is a warning that a rat is testing your defenses. Fix it right away, before it becomes a doorway.
Common Mistakes Homeowners Make When Getting Rid of Rats in Walls
Getting rid of rats is not particularly complicated, but a few common mistakes can turn a manageable problem into a much bigger one.
When to Call Professional Rat Removal
I like DIY, and a small rat problem can often be handled with patience and the right equipment. But some situations call for a licensed pest control professional. Get help if you continue finding fresh droppings, hearing activity or catching rats despite consistent trapping and inspection. Don’t wait two weeks if the infestation is spreading, rats are damaging electrical wiring, or you cannot safely access the affected areas.
A good professional will inspect first, explain what they found, and talk about trapping and sealing before they mention poison. Be careful with anyone who wants to drop bait stations inside your walls without a plan for the carcasses. Ask what happens if a rat dies in the wall, and ask whether sealing work is included. If the service covers removal but not exclusion, ask who will handle the sealing work. Removing the rats without addressing their entry points can leave the house vulnerable to another infestation.
Prevention Tips to Keep Rats Out of Your Walls
Once your walls are quiet, the goal is to keep them that way. Rats are attracted to accessible food, water and shelter. Reducing these resources around your home makes the property less attractive to them.
Start with food. Keep pantry items, pet food and bird seed in thick plastic or metal containers with tight lids, because rats chew through bags and cardboard without effort. Pick up fallen fruit, clean grills, and don’t leave pet bowls outside overnight. Garbage is the next big attraction, so use bins with tight lids and keep them off the ground if you can.
If you compost kitchen scraps, use a sturdy, rodent-resistant compost bin with a secure lid. Avoid putting meat, fish or oily food scraps into open compost piles, as these can attract rats looking for an easy meal.
Then deal with shelter. Stack firewood at least a foot or two off the ground and away from the house. Clear clutter and piles of debris from the yard, garage and basement. Trim shrubs so they do not touch the walls, and keep tree branches well away from the roof. Dense ivy that climbs your siding is an easy ladder, so cut it back.
Fix water problems too. Repair leaky pipes, outdoor faucets and gutters, and make sure water drains away from the foundation. A damp crawl space is an open invitation.
Finally, build a habit of checking. At least once every three months, walk around the outside of your house and inspect vents, pipe gaps, foundation joints and roofline openings. Check more frequently if you have dealt with a recent infestation or notice fresh signs of rodent activity. Look for fresh droppings, gnaw marks and damaged screening. In areas where rat activity has been a recurring problem, you can use properly enclosed monitoring traps in locations inaccessible to children and pets. Regular inspections are much better than waiting until you hear scratching behind the walls again.
Final Thoughts
Getting rats out of walls takes more than setting a few traps. You need to identify how they’re getting inside, remove them safely, and seal the openings that allowed them in. Monitor the area afterward to make sure activity has stopped. If rats remain inaccessible or the problem continues, bring in a pest control professional.